Peeling Back the Past: A Foolproof Guide to Wallpaper Removal Without Drywall Damage

Wallpaper can transform a room with texture and personality, but tastes change, and eventually, that once-beloved pattern may need to go. For many homeowners, the prospect of removing wallpaper is daunting, primarily due to the fear of gouging or tearing the delicate paper facing of the drywall underneath. Damaging the drywall turns a simple aesthetic update into a tedious repair project involving joint compound, sanding, and dust. However, with the right strategy and a high-quality wallpaper removal kit – ROMAN, you can strip away the old layers while keeping your walls perfectly intact. Success lies in patience, the right chemical assistance, and a systematic approach that prioritizes moisture over brute force.
Preparing the Workspace and Your Tools
Before you begin the physical labor, preparation is essential to prevent a secondary mess. Wallpaper removal is an inherently wet and sticky process. Start by removing all furniture from the room or moving it to the center and covering it with plastic. Take down all wall hangings, outlet covers, and switch plates, being sure to cover the open electrical boxes with painter’s tape to prevent liquid from entering. Lay down drop cloths along the baseboards to catch the sodden strips of paper and the inevitable drips of removal solution.
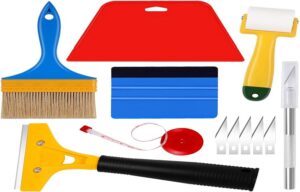
Your removal kit should typically include a scoring tool, a concentrated wallpaper stripping solution or enzyme-based spray, and a specialized scraper with a dull or rounded blade. The scoring tool is perhaps the most misunderstood part of the kit. It features small rotating wheels that create tiny perforations in the wallpaper’s surface. These holes allow the stripping solution to penetrate the outer decorative layer and reach the adhesive backing. When using the scoring tool, apply very light pressure; the goal is to nick the paper, not to carve grooves into the drywall behind it.
Read More: Sanctuary of Sleep: A Comprehensive Guide to Choosing Hypoallergenic Bedding
Applying the Stripping Solution for Maximum Effect
Once the entire wall has been lightly scored, it is time to apply the removal solution. Most kits provide a concentrate that you mix with warm water in a spray bottle or a garden pressure sprayer. The warmth of the water helps activate the enzymes or surfactants in the solution, which are designed to break down the molecular bonds of the wallpaper paste. Spray a manageable section of the wall, roughly three or four feet wide, starting from the top and working your way down.
The most common mistake at this stage is rushing. After soaking a section, wait at least fifteen to twenty minutes. The paper should look saturated and may even begin to bubble or peel away from the wall on its own. If the solution dries out before you start scraping, the glue will simply re-harden, making your job much more difficult. Keep a spray bottle handy to mist any areas that appear to be drying too quickly. The goal is to keep the adhesive in a gelatinous, soft state.
Read More: Vintage Under the Stairs: Custom Wine Cellars for Small Spaces
The Art of Safe Scraping
When the paper is sufficiently soft, find a loose edge—usually at a seam or near the baseboard—and begin to lift it with your fingers or the scraper tool. If the solution has done its job, large sections of the top layer should pull away with ease. For the stubborn bits of backing that remain, use your scraper with a shallow angle. Keep the blade as flat against the wall as possible to avoid catching the corner of the tool in the drywall.
If you encounter resistance, do not try to force the paper off. Pushing too hard with a metal or plastic blade is the fastest way to gouge the gypsum core of your walls. Instead, stop scraping and re-apply more removal solution to that specific spot. Patience is the ultimate protector of your drywall. By letting the chemicals do the heavy lifting, you ensure that the paper releases cleanly from the wall’s surface without taking the drywall’s paper skin with it.
Conclusion
Removing wallpaper does not have to be a home improvement nightmare. By utilizing a dedicated removal kit and following a careful process, you can achieve a clean slate for your next design project without the need for drywall repairs. The secret is to let the stripping solution do the work and to resist the urge to use excessive force with your scraper. Taking the time to score properly, soak thoroughly, and clean meticulously will result in smooth, undamaged walls that are ready for whatever new look you choose. While it requires a bit of elbow grease and a fair amount of patience, the professional results are well worth the effort, leaving you with a flawless surface and the satisfaction of a job well done.